 PA Trace for live sound
How to align subs and tops
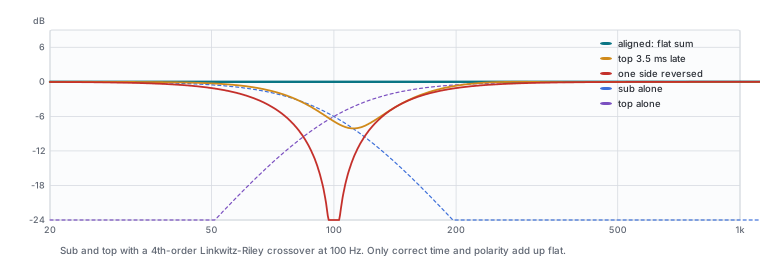
Subwoofers and main loudspeakers overlap for an octave or more around their crossover. In time and in polarity they add up; out of time they cancel exactly where you need the energy most. This guide shows how to measure the two, find the right delay and polarity, and check that the result holds across the audience.
Updated 17 November 2026
Why the crossover needs alignment
A subwoofer and a top box are usually at different distances from the listener, have different filters and different internal delays. At the crossover both play the same frequencies. Where their phase matches they sum to +6 dB; where it is 180° apart they cancel. A cancellation at the crossover looks like a hole in the response that no EQ can fill, so the timing must be fixed first.
What you need
- A dual-channel measurement program, a measurement microphone and an interface with two inputs: one for the microphone, one for the reference signal from the console or processor.
- Access to the system processor, to set delay and polarity per output.
- A way to mute the subs and the tops separately.
Step 1: choose the microphone position
An alignment is exact only where the microphone is. Put it where the two sources matter most for the audience, usually where they are about equally loud through the crossover, at ear height and away from walls. For a ground stacked sub with flown tops, that is often a third to half of the way back in the room. Write the position down: you will want to come back to it.
Step 2: set the time reference
Start the transfer function with the tops alone and let the program find the delay to the microphone (in PA Trace: Find, or Track). The phase flattens and the impulse response peak sits at zero. From now on keep this inserted delay fixed: both sources must be measured against the same reference, or their phases cannot be compared.
Step 3: measure each source alone
- Tops alone: let the trace settle, check the coherence is high through the crossover, and capture it.
- Subs alone, tops muted: same microphone, same inserted delay. Band-limiting the noise to the sub range helps the coherence. Capture it.
Average deeper outdoors or in noise: low frequencies need long windows and wind moves the arrival. Low coherence means the phase at that frequency is not reliable.
Step 4: read the crossover
Look at the frequency range where the two magnitudes are within about 10 dB of each other: that is where they interact. In that range compare the two phase traces.
- If the phases lie on top of each other, the sources are aligned.
- If one is parallel to the other but shifted, one arrives later: add delay to the earlier one. A difference in phase slope means a difference in time.
- If they are about 180° apart over the whole overlap, flip the polarity of one of them.
- Several answers can look good: a delay one full cycle later also lines the phase up at one frequency. Choose the one that is in time at the crossover, not one a cycle away, or the sum falls apart either side of it.
Step 5: let the software do the arithmetic (optional)
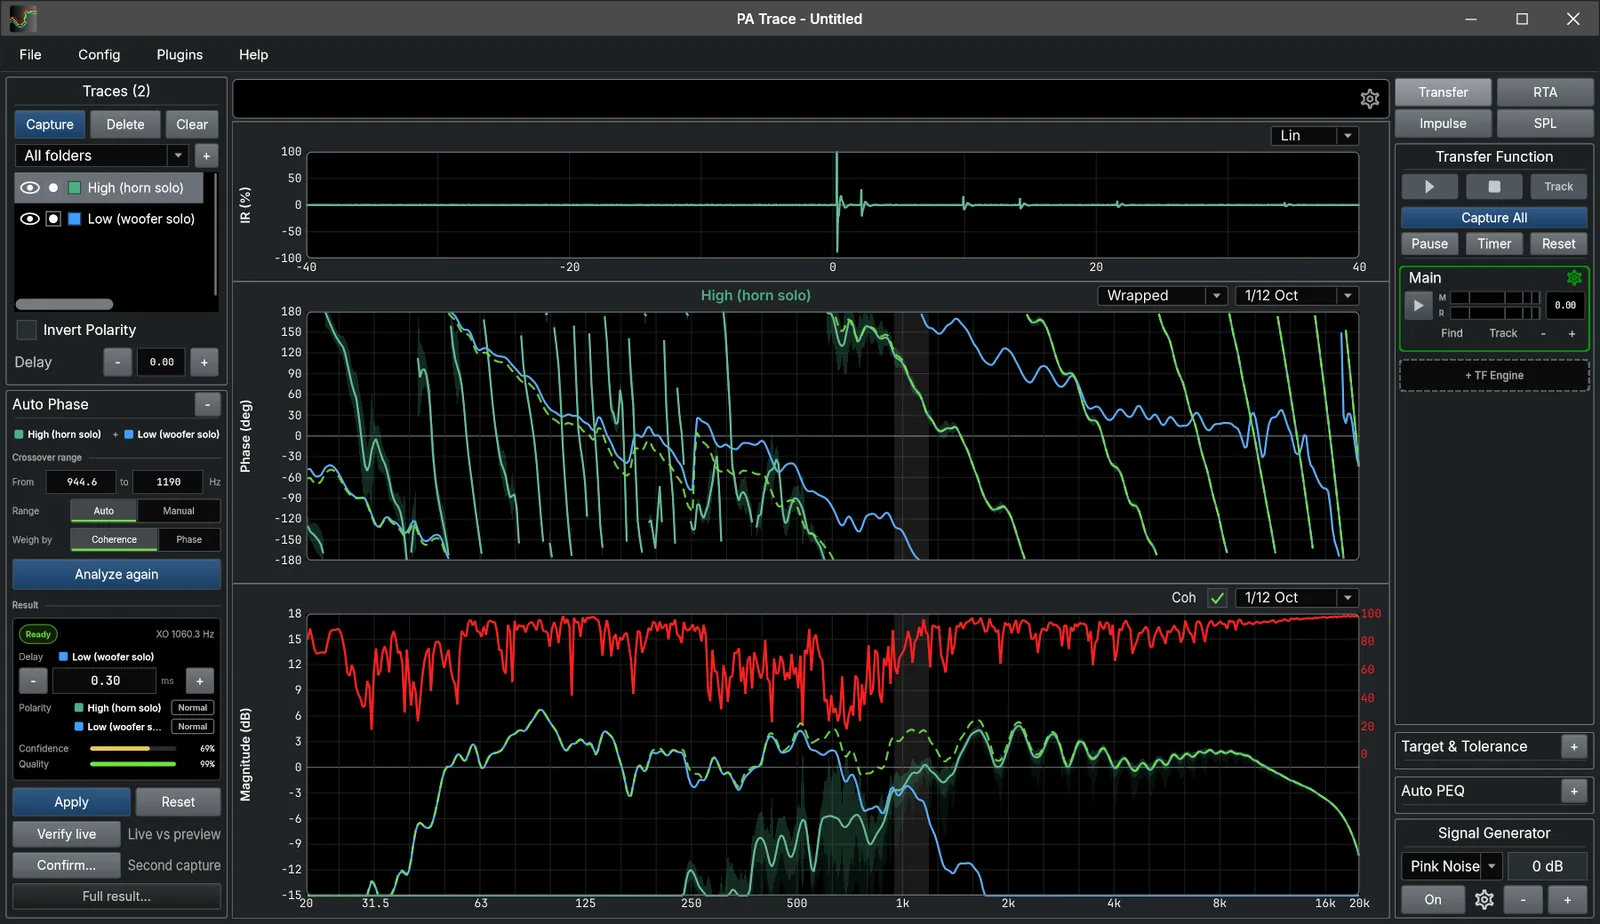
In PA Trace, tick the two captured traces and press Analyze crossover in the Auto Phase panel. It searches delay and polarity over the overlap, weighted by coherence, and returns the delay to set, the polarity, a confidence and a quality, and draws the predicted sum as a dashed curve. With wind or noise, Confirm repeats it on a second pair of captures; two separate captures rarely agree on a wrong answer.
Step 6: set it and verify
- Enter the delay and polarity in the processor, on the source that has to wait (usually the closer one).
- Unmute both and measure them together. Through the crossover the summed magnitude should rise above each source alone, and the phase should run smoothly from one to the other. In PA Trace, Verify live compares the live sum with the predicted one.
- Capture the result with a clear name: it documents the job.
Step 7: check other seats
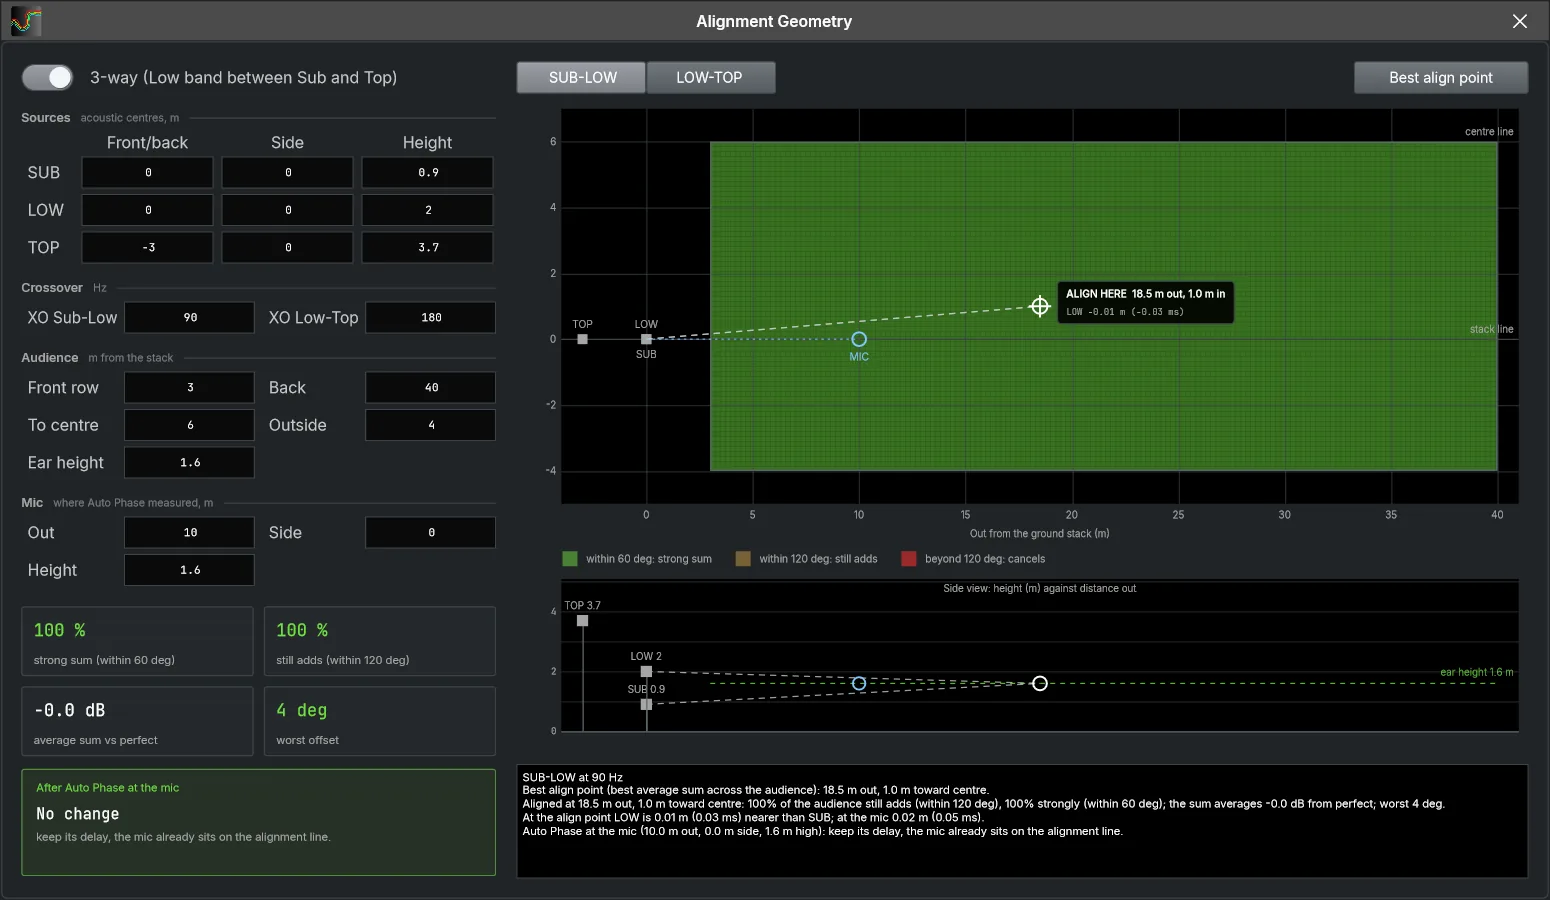
Distances change across the audience, and with them the time difference between subs and tops. Measure a few other positions, front, back and sides. If the alignment drifts badly, choose the compromise that serves most of the audience, or plan the arrangement differently. PA Trace's Alignment Geometry shows how far the alignment holds over the audience area from the positions of the boxes.
Common mistakes
- Changing the inserted delay between captures. Then you compare two different time references.
- Aligning at the front row. It is exact there and wrong for most of the audience.
- EQing the hole. A cancellation does not fill with gain; fix the timing.
- Trusting phase where coherence is low. Average deeper or wait for the wind to drop. See coherence explained.
Related guides
- Polarity check Read polarity in the impulse response and the phase, and why subs and crossovers fool the quick check.
- Delay speakers and fills Measure the arrival of each source where they overlap, delay the earlier one, and check the comb filter is gone.
- Coherence explained What the coherence trace means, what each pattern of low coherence points to, and how to raise it.
- How to tune a PA system, step by step The order of work, from verifying the system to EQ and documentation.